
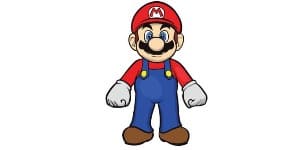
Mario Drawing
“Mario,” the famous character, first appeared in 1981 in the Nintendo franchise donkey kong game. It is famous as the “Mr. Video” or “Jumpman” or “Mario.” Mario is a Japanese qualities. This game was named after the famous American businessman Mario Segale. Mario was a short plumber who lived in the mushroom kingdom. Miyamoto expected this short character to be unpopular and planned his brief appearance. The star super Mario brothers game series appeared in 1985. It becomes a super-duper hit and a legend. It began to branch off different genres of games. Mario is the most famous character in video games ever. The popularity of video games has only recently increased. Video games are one of the best and biggest entertainment media nowadays worldwide. Because of this recent popularity, few video game characters are considered household names. Mario is one of the characters that are famous with a lot of fans globally.
Each of us played this favorite video game in our lifetime. If you are a fan of this jumping Italian plumber, I will take you to a tutorial about Mario drawing. It appears in more than 200 games. Mario is the most successful game franchise ever created by the Nintendo corporation. This famous character has been part of many books, television series, films, and toys. Are you willing how to draw Mario? If yes, our tutorial for easy Mario drawing will benefit you. You can do Mario drawing easy by following our stepwise tutorial.
How to draw Mario Step By Step
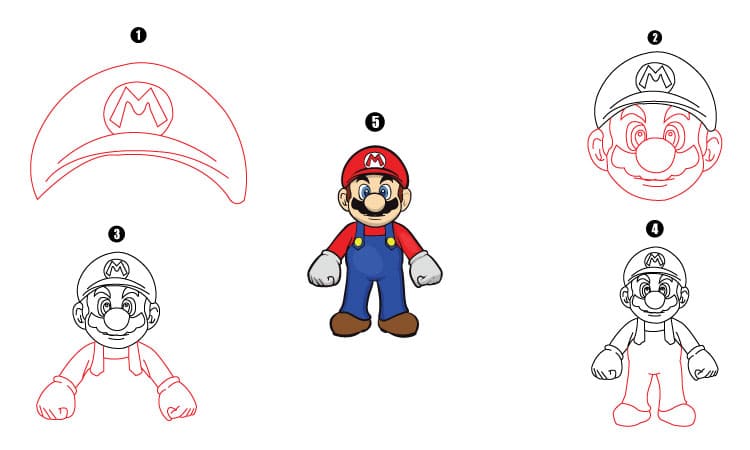
Kids will learn Mario drawing by following this stepwise tutorial. This stepwise approach enables you to Mario drawing easy.
Step 1:
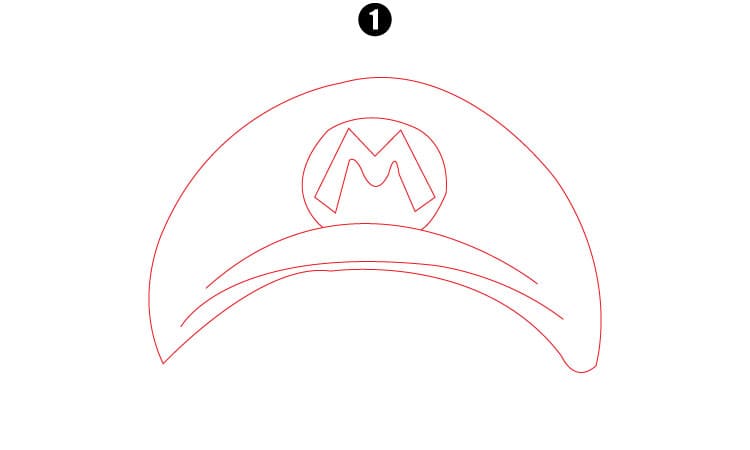
Begin Mario drawing by outlining his cap with the signature Mario. For this, we will begin with long wavy curved lines. Then we will extend the curve line to form the brim o the cap extending from the ear to the opposite side of the face and jaws with an enclosed curved line. Draw a curved line over the brim. Then draw a small circle over the cap, and within the circle, draw the letter “M” for Mario. Draw some hairs on the sides of his ears.
Step 2:
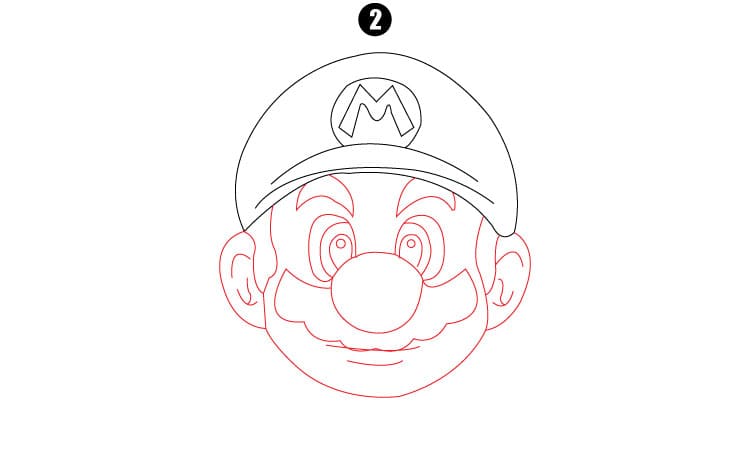
In the 2nd step of Mario Drawing, we will draw his face. We will sketch a long “U” shaped line connecting to the cap’s brim. Then draw a circle within the “U” line to form Mario’s nose. We will draw “C” shaped lines for Mario’s ears and add more detail to the ear by drawing inner smaller “C” lines for ear folds. Then we will extend the tiny curved lines from each side of the nose.
Now we will draw a series of short and connected curved lines to form the edges of his mustache. And now draw big oval shapes near his round nose of Mario to form his big eyes. Now draw two smaller circles within the ovals for the pupil of his eyes. Then, draw a couple of paired curved lines over the eyes to form his eyebrows.
Step 3:
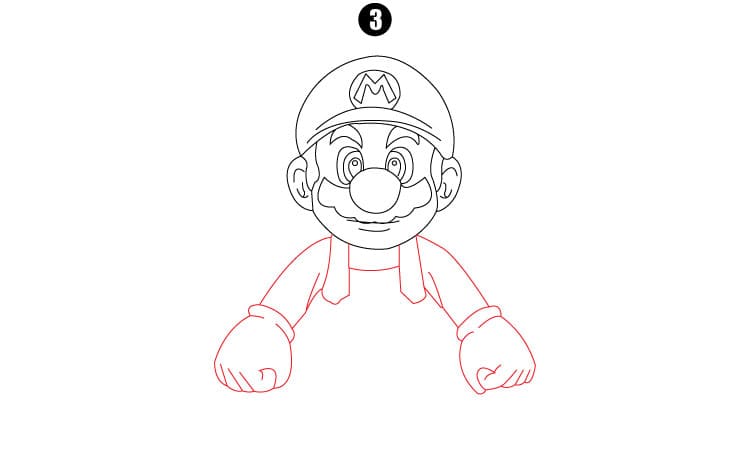
We will draw his shirt and arms in the 3rd step of Mario’s drawing. For this, we will begin to draw two sets of slightly parallel lines from the neck to complete the braces of his costume. We will connect these braces with a horizontal line. Then we will draw his arms. We will draw a pair of parallel lines to form his arm. Then using some curved lines, we will draw his fist and repeat the process for the other arm.
Step 4:
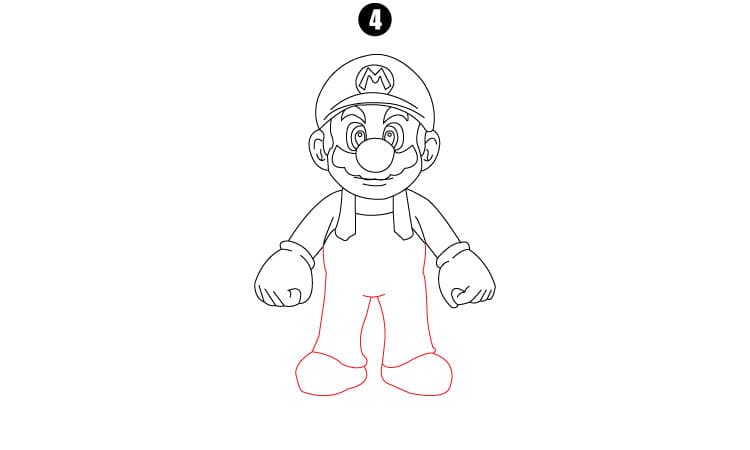
In this 4th step of Mario’s Drawing, we will draw his abdomen and legs. We will draw two parallel lines from opposite sides just beneath his arms and move down to his feet. Then we will connect these parallel lines with an inverted “V” shape line. Use an oblong oval shape from above and a flattened shape from the downside to making the soles and feet Mario. Repeat the process for both sides of the feet. Our Mario drawing is easy and is ready to color in cheerful colors.
Step 5:
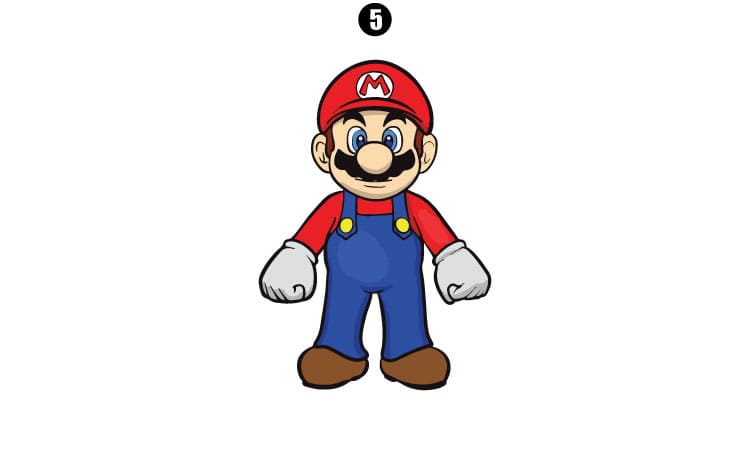
Our Mario Drawing is complete, and it is ready for coloring. This step is very inspiring and motivating for kids as they get excited about coloring. So, kids, pick up your blue, yellow, tan, red, and white colors for this easy Mario drawing.
Conclusion:
This tutorial about how to draw Mario will benefit you. By following the stepwise approach, we are confident you can do Mario drawing and will impress your friends and family. If you like our tutorial on this drawing, then please share it with your friends and family. Please keep visiting our website for more inspiring and engaging drawings. And let us know about your valuable feedback in our comment section.
You May Also Like: